


Getting Started With Zephyr: Kconfig
In a previous blog post, I introduced The Zephyr Project RTOS and demonstrated a personal best practice when starting with “Zephyr.” In that blog post, you saw how a custom West manifest file is an excellent way to ensure your code is always at a known baseline when you start development. What is the next step in your Zephyr journey after creating your custom manifest file and using West to establish your baseline repositories?
One of the first steps in implementing embedded software is enabling specific peripherals, features, and subsystems. Certain MCU vendors, such as STM32, Microchip, and TI, include tools within their IDEs that allow developers to enable peripherals within a developer’s project and add subsystems to their codebase. However, these tools are tightly coupled with the MCUs that the vendors offer. It is difficult (if not impossible) to apply the same functionality these tools provide to other MCUs.
However, The Zephyr Project RTOS offers a vendor-neutral mechanism to allow us to enable a particular MCU subsystem or feature. This mechanism can be used with a GUI or a command line for those who aren’t keen on GUIs (that’s me!). This utility is called “Kconfig.” In this blog post, I will describe what Kconfig is, how it works, and the different ways we can use Kconfig to add specific features and subsystems to our Zephyr-based project.
WHAT IS KCONFIG?
Kconfig was originally developed as part of the Linux kernel and is still used today as part of the kernel compilation process. Kconfig contains a specific grammar. The details of the Kconfig implementation in the Linux kernel are fascinating, but outside of the scope of this blog post. Instead, if you're interested, you can read an article I wrote that walks through the Kconfig source code here: https://www.linux-magazine.com/Issues/2021/244/Kconfig-Deep-Dive.
However, getting comfortable with the format of a "Kconfig" (the colloquial term for a particular configuration option) is easy after looking at an example. There are three main elements of the Kconfig system.
First, there is the collection of Kconfig files scattered across different OS codebase directories. For example, if we look under "drivers/led" within the Zephyr codebase, we see a file named Kconfig with the following contents:
 menuconfig LED
     bool "Light-Emitting Diode (LED) drivers"
     help
      Include LED drivers in the system configuration
if LED
.
.
.
config LED_SHELL
    bool "LED shell"
    depends on SHELL
    help
      Enable LED shell for testing.
source "drivers/led/Kconfig.gpio"
.
.
.
endif # LED
The line which starts with "menuconfig" instructs the Kconfig system that "LED" contains a series of feature options that are only visible if the “LED” feature is enabled, which is handled by the if statement. Subsequently, if the “LED” feature is enabled, the user can enable the “LED_SHELL” option. The following line indicates that the result of this configuration option is a Boolean, which dictates whether this feature is enabled or disabled. Besides a Boolean, the result of a configuration option can also be an integer, in the event the option refers to a specific configuration parameter. The line that begins with "depends" specifies that the “SHELL” feature must be enabled for the “LED_SHELL” feature to be visible. Thus, the “LED_SHELL” feature will only be visible if the “LED” and “SHELL” features are first enabled. The two lines that start with "help" offer a more thorough description of the feature. Finally, the last line before the "endif" allows us to reference other Kconfig files, which helps organize components into different categories. The features of the referenced file are included in the current file as if they were copied and pasted. It is important to note that the path given to “source” is from the root of the Zephyr codebase.
HOW SHOULD YOU USE KCONFIG?
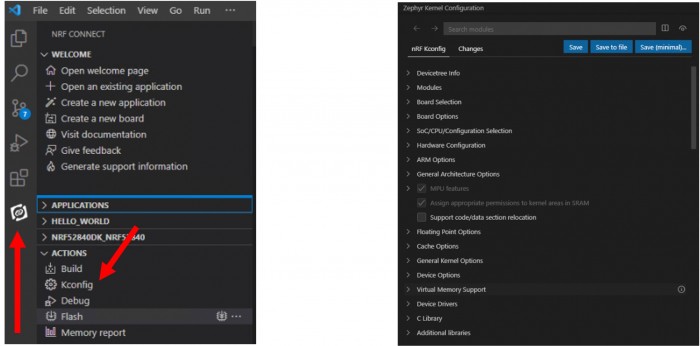
The second element in the Kconfig infrastructure is a set of applications allowing users to turn the features specified in all Kconfig files on or off. Zephyr offers an extension in Visual Studio Code that allows users to conduct this task using a GUI, as shown below.
The VS Code extension offers an alternative to using a GUI for fans of the command line (such as myself). The extension can take a file, the last element of the Kconfig infrastructure, which contains a set of configuration options that are turned on or off and configures Zephyr accordingly. The following snippet shows an example.
CONFIG_BT=y
CONFIG_BT_PERIPHERAL=y
CONFIG_BT_GATT_CLIENT=y
CONFIG_BT_MAX_CONN=1
CONFIG_BT_L2CAP_TX_MTU=250
CONFIG_BT_BUF_ACL_RX_SIZE=254
The format of the file is straightforward. Each line begins with “CONFIG_,” followed by the name of the configuration option. The line then contains an “=“ sign, followed by either a ‘y’ to enable the feature or an ‘n’ to turn off the feature. In the above example, we enable the Bluetooth stack in Zephyr and certain stack features and configure stack parameters. In most applications based on Zephyr, “prj. conf” is the default file that contains user-defined features.
CONCLUSION
And that’s it (I told you this would be easy after reviewing an example)!
The Kconfig infrastructure is a powerful, vendor-agnostic mechanism that The Zephyr Project RTOS offers to configure our entire application comprehensively. It cannot only turn on or off individual stacks within the RTOS and set configuration parameters but can also be used to control specific subsystems and peripherals within the MCU.


- Comments
- Write a Comment Select to add a comment
To post reply to a comment, click on the 'reply' button attached to each comment. To post a new comment (not a reply to a comment) check out the 'Write a Comment' tab at the top of the comments.
Please login (on the right) if you already have an account on this platform.
Otherwise, please use this form to register (free) an join one of the largest online community for Electrical/Embedded/DSP/FPGA/ML engineers:


