


Basler pylon on Raspberry Pi with Yocto
Camera vendors are increasing offering Yocto layers to simplify the integration of drivers and the creation of cross-compilation environments. This article demonstrates how Yocto can be used to integrate Basler pylon into a Raspberry Pi Linux image.
Basler's pylon Camera Software Suite includes an SDK, a viewer and drivers for development and operation of vision software using Basler cameras. When deployed in Windows environments, pylon is usually installed on a booted Windows image using a Windows installer. When developing Embedded Linux based devices, the Yocto project is often used to create custom, stripped-down Linux images for production environments. When working with Yocto, layers are the primary mechanism though which Linux images are customized. A layer contains metadata which tells the Yocto build system (BitBake) how to build the target. Basler have created Yocto layers for their USB, GigE and MIPI cameras.
Setting up Yocto
Refer to the Yocto System Requirements web page to correctly setup the Linux build host and dependencies. At the time of writing, the Basler Yocto repository supports the "honister" Yocto release, which is used throughout this article. Once the build host is setup, we start by cloning the Yocto project repository.
$ git clone -b honister git://git.yoctoproject.org/poky.git
We then clone the following two dependency layers at the same level as the poky directory. The meta-raspberrypi layer contains the BSPs for all Raspberry Pi boards, allowing us to build images customized for the Raspberry Pi.
$ git clone -b honister git://git.openembedded.org/meta-openembedded
$ git clone -b honister git://git.yoctoproject.org/meta-raspberrypi
The next step is to clone Basler's Yocto layer, which enables us to build the pylon SDK, viewer and drivers.
$ git clone -b honister https://github.com/basler/meta-basler-tools.git
The following command sets up the BitBake environment, creating variables and putting us into a newly created build-rpi-wayland directory.
$ source poky/oe-init-build-env build-rpi-wayland
We then use the bitbake-layers command to add the necessary layers to our image.
$ bitbake-layers add-layer ../meta-openembedded/meta-oe
$ bitbake-layers add-layer ../meta-openembedded/meta-python
$ bitbake-layers add-layer ../meta-openembedded/meta-networking
$ bitbake-layers add-layer ../meta-openembedded/meta-multimedia
$ bitbake-layers add-layer ../meta-basler-tools
$ bitbake-layers add-layer ../meta-raspberrypi
The following command allows verification of the layer addition process. There should be nine layers in the list, the latter six of which should be in the order above.
$ bitbake-layers show-layers
Modifying the Yocto configuration files and building
Prior to building the image with BitBake, there are a number of changes to make in the Yocto configuration files. Within the build directory, we first set the MACHINE variable in the conf/local.conf file. The example below is for a Raspberry Pi 3; if using a Raspberry Pi 4, use "raspberrypi4-64".
MACHINE = "raspberrypi3-64"
We will make two additions to the EXTRA_IMAGE_FEATURES variable in the conf/local.conf file. The first adds an SSH server and the second adds a Wayland desktop.
EXTRA_IMAGE_FEATURES ?= "debug-tweaks ssh-server-openssh weston"
To finish our build setup in our conf/local.conf file, we'll add the OpenCV and pylon packages and accept the pylon license agreement.
IMAGE_INSTALL:append = " opencv pylon"
ACCEPT_BASLER_EULA = "1"
We can now proceed to build the image using BitBake, which will take a number of hours the first time the build is ran.
$ bitbake rpi-test-image
Upon successful completion of the build, there will be a file called rpi-test-image-raspberrypi*-64.rootfs.wic.bz2 in the tmp/deploy/images/raspberrypi*-64 directory of the build directory. This image file can be written to a microSD card using a tool such as Etcher. Once the image is written and the Raspberry Pi is booted with the new image, we can connect via SSH using the following command (connecting to a Raspberry Pi 3 in this case). Verifying the SSH connection is important as we'll be using SCP (Secure Copy Protocol) later in the article to copy files from the host to the target.
$ ssh root@raspberrypi3-64.local
While connected to the target via SSH, we can also verify that pylon has been correctly installed. Running the following command should display the pylon shared object files.
# ls /opt/pylon/lib
Developing an application
Returning back to our build terminal instance on the host, the next step is to build the SDK on the host to allow cross-compilation of applications including Basler pylon and OpenCV. Running the following BitBake command will launch the SDK build process.
$ bitbake -c populate_sdk rpi-test-image
Following completion of the SDK build, we can install the SDK on the build host by running the script (.sh file) in the tmp/deploy/sdk directory of the build directory, which by default will install the SDK in /opt/poky/3.4.4. To complete the setup of our cross-compilation environment on the build host, we need to source the SDK environment setup file, which sets local variables. Note that this needs to be done in a separate terminal instance to that of the BitBake build.
$ source /opt/poky/3.4.4/environment-setup-cortexa53-poky-linux
We can check that our cross-compilation environment is correctly setup by printing the CXX variable. Running the following command should print the CXX flags for C++ cross-compilation.
$ echo $CXX
To demonstrate cross-compilation, we'll use code published on my GitHub page which grabs an image from the first available Basler camera and displays it using OpenCV. Once this git repository is cloned locally on the Linux build host, and our cross-compilation SDK is setup in the terminal, we can build the executable using the make command. Note that the Makefile uses the SDKTARGETSYSROOT environment variable in the compile and link flags. Upon successful compilation, an executable named "pylon_example" will be generated, which can be copied from the build host to the target using the following command.
$ scp ./pylon_example root@raspberrypi3-64.local:/home/root
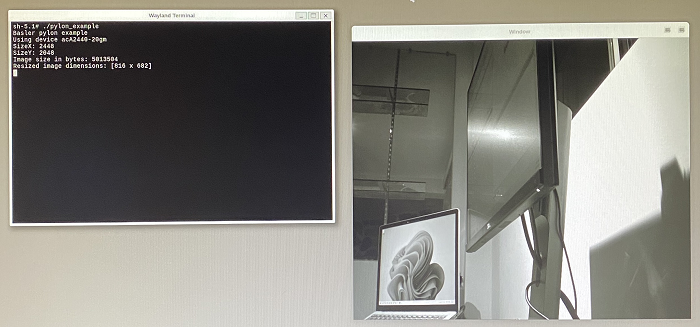
To test the application, I used a Basler acA2440-20gm connected to the Raspberry Pi via an unmanaged switch. Running the executable on the Raspberry Pi prints the image capture information in the terminal and displays a downsized image using OpenCV.
Conclusion
The Yocto project offers powerful tools to build custom Embedded Linux images and SDKs for cross-compilation. Camera vendors are increasingly providing Yocto layers to facilitate driver integration into Yocto images.


- Comments
- Write a Comment Select to add a comment
To post reply to a comment, click on the 'reply' button attached to each comment. To post a new comment (not a reply to a comment) check out the 'Write a Comment' tab at the top of the comments.
Please login (on the right) if you already have an account on this platform.
Otherwise, please use this form to register (free) an join one of the largest online community for Electrical/Embedded/DSP/FPGA/ML engineers:


