


Getting Started With Embedded Linux - From Nothing To A Login Prompt
One of the famous observations that have been made related to embedded systems is referred to as “Moore’s Law”, which states that the number of transistors in integrated circuits doubles every year. This observation has held mostly true for the past several decades, so powerful CPUs are no longer simply relegated to servers, desktops, and laptops. Instead, we see powerful CPUs with increased capabilities being introduced into embedded systems on devices that live at “the edge”. While certain use cases still require “bare-metal” development, certain applications are keen to leverage the increased capabilities of modern processors in embedded systems. Linux is a better alternative for these applications.The term “Linux” can mean different things depending on the context; it can mean the “kernel”, which is the core application responsible for interfacing with the hardware and managing resources. Or, the term can mean the entire operating system, containing both the kernel and the applications that run on the CPU. In this blog post, we’re going to focus on the latter connotation.
However, unlike PCs, installing Linux on an embedded system isn’t usually as straightforward as plugging in a USB stick and walking through a GUI. Instead, when bringing up a board that can run Linux, there isn’t even a “bootloader” installed (which would be the equivalent of BIOS on a typical PC). Instead, we must go through the process of creating an image that will exercise the CPU and other devices on the board and flash the image. Usually, a framework is needed to create the Linux image. In this blog post, we’re going to focus on using The Yocto Project/OpenEmbedded framework (https://www.yoctoproject.org/). Our target board is the Toradex (https://www.toradex.com) Dahlia carrier board coupled with a Verdin iMX8M Mini System on Module, or SoM for short. A SoM is simply a CPU, such as an NXP iMX8M Mini, with extra components that a vendor, such as Toradex, adds to alleviate the responsibility of the end user. While Toradex SoMs already have Linux pre-installed on them, it is still an excellent exercise to understand the process of creating and flashing a Linux image.
This blog post assumes we are running Linux on our build PC, with Docker installed. A docker container is made available at the following GitHub repository: https://github.com/mabembedded/dockerfiles. We can save the file “Dockerfile.yocto” from the repository to our PC as “Dockerfile” and execute the following command inside the directory where the file is downloaded:
$> docker build -t yocto-builder .
Once the Docker container has been built, we will need to execute the following command to run the Docker container (where “<>
$> docker run -it -v<yocto-dir>:/home/dev/src:z yocto-builder
After we are inside the Docker container, we can execute the following commands to download the source files that will comprise the Linux OS that will be flashed onto the Toradex board:
dev@5bfa72bcec65:~$ cd src
dev@5bfa72bcec65:~/src$ repo init -u https://git.toradex.com/toradex-manifest.git -b dunfell-5.x.y -m tdxref/default.xml
dev@5bfa72bcec65:~/src$ repo sync
Once all the source files have been downloaded, we can execute the following command to set up The Yocto Project/OpenEmbedded environment:
dev@5bfa72bcec65:~/src/$ source export
After executing the above command, we will want to modify local.conf under the conf directory to instruct The Yocto Project/OpenEmbedded framework to build an image for the Verdin iMX8M Mini. Specifically, we will want to remove the ‘#’ at the start of the following line:
#MACHINE ?= "verdin-imx8mm"
After making the change, saving and closing the file, we can execute the following command to kick off the build (and grab a long coffee or snack!):
dev@5bfa72bcec65:~/src/build$ bitbake tdx-reference-minimal-image
After the above command completes, we will have a complete image that can be flashed onto our device. The image is in the directory build/tmp/deploy/images/verdin-imx8mm. The file Reference-Minimal-Image-verdin-imx8mm.wic.bmap contains the image of the bootloader and Linux operating system that we will flash onto our board. We will first configure the board as shown in the following image:
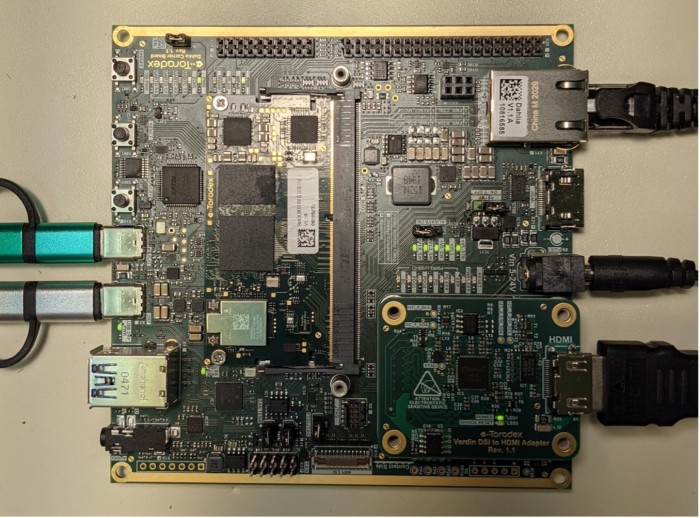
The green USB-C cable is meant to provide us with a console connection to the board. The silver USB-C cable allows us to transfer the image to the board. While of course the power cable is necessary, the Ethernet and HDMI cables are optional.
After powering up the board, we will immediately hit the Enter key on our keyboard to halt the boot process. Then we will execute the following command so that the board appears as a USB device to our PC:
Verdin iMX8MM # ums 0 mmc 0
After we execute the above command, we will notice that a USB flash drive has appeared on our PC, We will then execute the following command on our Linux PC to flash the image onto the board (Note: the board may appear as a device other than /dev/sdg on your specific PC):
[verdin-ixm8mm]$ sudo bmaptool copy –bmap Reference-Minimal-Image-verdin-imx8mm.wic.bmap Reference-Minimal-Image-verdin-imx8mm.wic.gz /dev/sdg
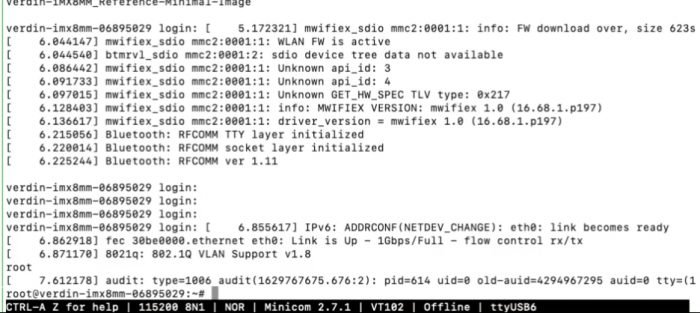
After the above command completes, we can go back to the console interface to the board, hit Ctrl-C on our keyboard, and enter the “boot” command to boot our board with our newly created Linux OS, and we will see a login prompt, as shown below!
In summary, we demonstrated how The Yocto Project/OpenEmbedded framework could be used to create a Linux operating system that can be flashed onto an embedded system, such as a Toradex Verdin iMX8M Mini running on a Dahlia carrier board.


- Comments
- Write a Comment Select to add a comment
To post reply to a comment, click on the 'reply' button attached to each comment. To post a new comment (not a reply to a comment) check out the 'Write a Comment' tab at the top of the comments.
Please login (on the right) if you already have an account on this platform.
Otherwise, please use this form to register (free) an join one of the largest online community for Electrical/Embedded/DSP/FPGA/ML engineers:


