


VHDL tutorial - Creating a hierarchical design
Quick Links
- Part 1: VHDL tutorial
- Part 2: part 2 - Testbench
- Part 3: combining clocked and sequential logic
- Part 4: Creating a hierarchical design
- Part 5: A practical example - part 1 - Hardware
- Part 6: A practical example - part 2 - VHDL coding
- Part 7: A practical example - part 3 - VHDL testbench
In earlier blog entries I introduced some of the basic VHDL concepts. First, developing a function ('VHDL tutorial') and later verifying and refining it ('VHDL tutorial - part 2 - Testbench' and 'VHDL tutorial - combining clocked and sequential logic'). In this entry I will describe how to build a VHDL design made up of a collection of smaller pieces (similar to using subroutines in software development).
When developing a design in VHDL, the first impulse is to describe the entire design in a single file. Another common situation arises when a simple, existing design grows in complexity. Either way, you can end up with a design that becomes more and more difficult to read and maintain.
By adopting a more hierarchical design approach it is possible to reuse common elements, and segment a complex design into smaller pieces. Both of these techniques result in a more maintainable design. VHDL allows you to define and describe an 'entity', which can then be included into other, higher-level designs. Using entities, it is possible to both hide complexity and to manage changes more effectively (modify a single instance of a component, effecting multiple uses of the component). In this example, we will define a simple entity of a counter (or divider) which we can then replicate in the main module.
The first step in creating an entity, is to define its input(s) and output(s). In this example we will create a simple divide by ten counter. This counter will have two input signals (rst and clkin). The counter will also have a single output signal (clkout). The output signal is of the 'inout' type. This type is usable as either an input or output. This type is used to allow us to construct a simple state toggle for the 'clkout' output. The definition of our entity, for this example then looks like:

The definition includes the name of entity (div1) and the declaration of the inputs and outputs (name and type). In this example, 'rst' is used to initialize and synchronize the counters (this can be used to insure that a full count occurs prior to an output toggle).
With the definition complete, we can begin to design the logic (or behavior) of the counter. First, we need to define the necessary variables and a process to provide the logic for our entity. A signal is needed to provide a 'counter-down' variable (clkdiv). For this example, we will use a 3-bit, unsigned integer. The number of bits needed is determined by one half the division value, as this is a symmetrical counter (count down, toggle, count down, toggle, producing a 50% duty cycle).
| Number of bits (unsigned integer) |
Counter Range |
| 1 | ÷ 4 |
| 2 | ÷ 4 through 8 |
| 3 | ÷ 4 through 16 |
| 4 | ÷ 4 through 32 |
Here is the main body of our ÷ 10 entity.
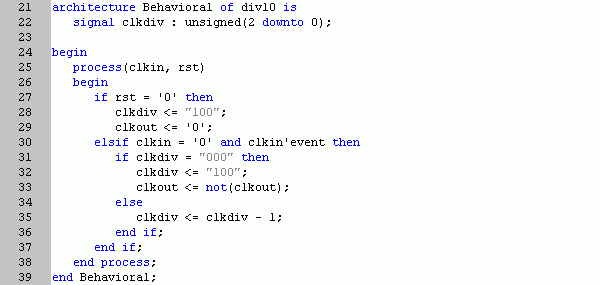
Line 25 shows the process declaration and the input sensitivity list. The sensitivity list defines the input(s) that can effect a change of the output(s) in the process. In this case, both rst and clkin can cause the output (clkout) to change. Lines 27-29 are the initialization part of the process. If rst is '0', the clock counter (clkdiv) is set to "100" (or 4) and clkout is set to '0'. If rst is not equal to '0', then the design will sample clkin for an event, in which the clkin input is equal to '0'. An 'event' is the detection of a change in state of a variable. Thus, Line 30, translates into: "if clkin changes from '1' to '0' then". If this is the case, Lines 31-36 are processed according to the state of the clkdiv variable. If clkdiv is equal to '000' (terminal count), the clkdiv variable is reset to "100" (line 32) and the output (clkout) is toggled (i.e. the logic state of clkout is inverted, 0->1, or 1->0, line 33). If the clkdiv value is not zero, the value is decremented by one (counted down, line 35).
This completes the definition of the entity div10. The following is the complete module for our ÷ 10 counter.

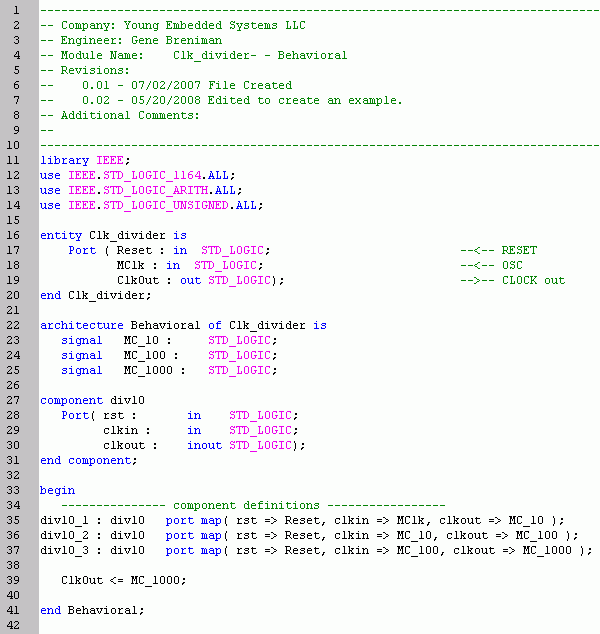
With the entity complete, we will define another module that will use this entity as a component of the design. To demonstrate the use of the entity, I have constructed a very simple example that will create a chain of divide by ten counters, to achieve a total clock division of 1000.
The first step in constructing the upper-level module is to define its inputs and outputs. In this example we need only three I/O definitions. The first is a global reset input that can be passed down to the counter/dividers. The next input is a clock input, which is passed to the initial counter/divider. And finally, we need an output signal to pass our clock divided signal out of the device.

The next step is to create variables for the outputs of each of the three divider stages. These variables will represent the input clock ÷ 10 (MC_10), the input clock ÷ 100 (MC_100) and the input clock ÷ 1000 (MC_1000).

In order to use our ÷ 10 entity (div10), created above, we need to generate a component description that matches our newly created entity.

With all the inputs, outputs, variables and components defined, we can connect the components to construct our divider chain. Each instance of our component receives the same reset signal (Reset), but have unique clock in and clock out variables. The first divider uses our master clock (MClk) to generate the ÷ 10 clock (MC_10). The second divider uses the ÷ 10 clock (MC_10) to generate the ÷ 100 clock (MC_100). The final divider uses the ÷ 100 clock (MC_100) to generate the ÷ 1000 clock (MC_1000).

Putting all the pieces together, with the necessary boiler plate, gives us our completed high-level module. In line 39 of our example, the output of the third counter (MC_1000, which is actual defined as an inout pin, due to its dual usage in the divide by 10 entity) is assigned to our device output pin (ClkOut). This assignment transfers the value of the 'inout' signal to our device output pin.
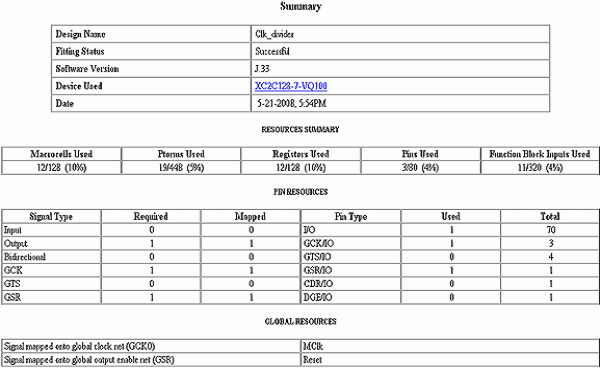
The created example compiled easily into the XC2C128-7VQ100 part. The summary shows that the part is only partially full (<10%), leaving plenty of room for still future enhancements.
Hopefully this example will assist you in using a hierarchical design approach in your VHDL projects. I have found this technique to be an extremely useful tool. In one project, I used multiple instances of multiple divider components to build a large programmable divider chain. By hiding all of the divider implementation into lower-level modules, I was left with a much more readable high-level module.
Thank you for your comments and suggestions. I look forward to any further questions.
Good luck and happy designing!
Gene
(Note: Pardon my lack of recent blog entries. I have been recovering from a broken finger of my dominate (right) hand. Typing and mousing have been a challenge for a while. Rehab has been going well, and my normal hunt and peck typing skills are returning to normal)


- Comments
- Write a Comment Select to add a comment

To post reply to a comment, click on the 'reply' button attached to each comment. To post a new comment (not a reply to a comment) check out the 'Write a Comment' tab at the top of the comments.
Please login (on the right) if you already have an account on this platform.
Otherwise, please use this form to register (free) an join one of the largest online community for Electrical/Embedded/DSP/FPGA/ML engineers:


