


Coding Step 2 - Source Control
Articles in this series:
- Coding Step 0 - Development Environments
- Coding Step 1 - Hello World and Makefiles
- Coding Step 2 - Source Control
- Coding Step 3 - High-Level Requirements
- Coding Step 4 - Design
When I first started out in programming, version control was not an introductory topic. Not in the least because it required a 'server' (ie, a computer which a teenaged me couldn't afford) but because it seemed difficult and only useful to teams rather than individual developers - which I was. I may have been partially right initially, but as time went on and my skills in programming matured, so did my need for more advanced tools to make me a more productive programmer. I hesitated, procrastinated and delayed learning how to use version control until I could no longer bear it. I needed to learn version control - but what I needed worse was to unlearn all of the bad practices I had thought up instead of using version control. I used every trick in the book: having three different versions of the same file with _1, _2 or _3 at the end. Renaming a file with a ‘.old’ extension. Creating a new copy of my code every day. I never found a system that worked - until I actually tried using real version control.
Don’t repeat my mistake. Version control is such a fundamental concept to programming that the sooner you learn it, the easier your life will be from then on. With that in mind, in this article I’m going to present steps to install a version control program (Git) and use it to control the files in our Hello World project from Part 1.
Read on for step-by-step instructions from download to repository creation to your first commit.
Installing Git
Go to the following URL to begin the download of Git for Windows: http://git-scm.com/download/win
You’ll see a window something like this:

The download will start automatically as the red arrow shows.
This is of course the location to download Git for Windows. Users of other operating systems are out of luck as far as this tutorial is concerned.
Once downloaded, double click the installer file to begin the installation. This screen should appear (the software version may differ depending on when you download it):

Click Next.

This screen prompts you to accept the license agreement - which of course you must do to use the software. I promise it won’t bite - go ahead and click Next.

The default directory is acceptable (this path is for an x64 version of Windows, but the default will generally be acceptable). Click Next.
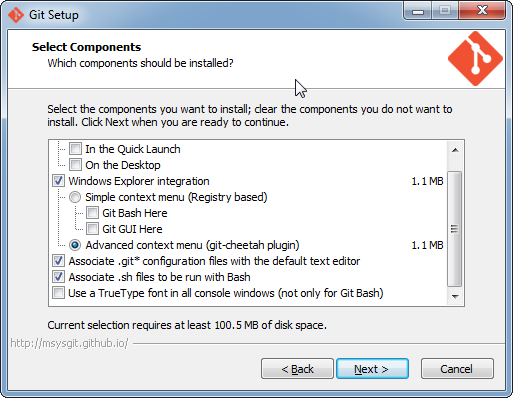
This screen presents the installation options - defaults are acceptable. Click Next.

Unless you strongly object to Start Menu folders you can click Next without changing any options.

This is where we have to deviate from the defaults. In this screen, select the ‘Use Git from the Windows Command Prompt’ option instead of the ‘Use Git from Git Bash Only’ option. This will allow us to do all of our work from the Command Prompt instead of Git’s built-in command-line interpreter. Once the correct option is selected, click Next.

Unlike the last screen I have no strong feelings one way or another about this screen. Click Next without changing anything.
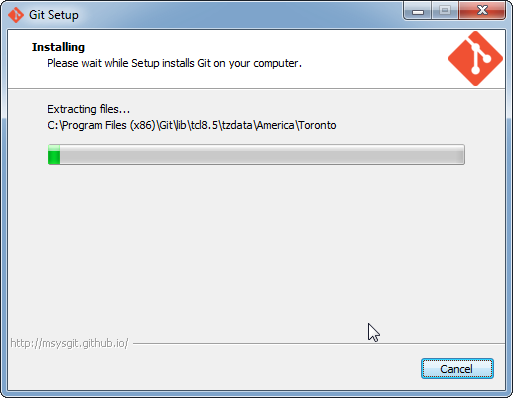
Finally the actual installation will begin - it will take some time though.

Eventually the installation will end - you can deselect the ‘View ReleaseNotes.rtf’ checkbox before clicking Finish.
Verifying Git Installation
Now you’ll want to verify the installation. The best way to do that is to open a command prompt:

Type ‘cmd’ into the Run dialog in the Start Menu and select ‘cmd.exe’ under Programs.

There’s no need to change directories - we’re just confirming Git installed properly. When the command prompt opens type ‘git’ in - you should see the above screen. If not, uninstall Git and follow the above instructions again.
Creating a Repository
In order to use Git on your source code you have to navigate to the directory the source is in and initialize the repo. I'll be using the directory I created from the previous article, so I would type the following:
cd C:\Users\Stephen\Dropbox\Projects\helloWorld
git init
You should of course substitute your project directory for the path above. When you do, you should see this result:
Initialized empty Git repository in C:/Users/Stephen/Dropbox/Projects/helloWorld
/.git/
What that message means is that Git just made the entire directory into a repository. This has no effect on any of the files already in the directory - all it does is create a new subdirectory called ‘.git’ which contains all of the version control data for this folder. It’s out of the scope of this article to discuss what exactly is in there so for now I’ll just say that all of the version control magic is in that folder and it’s important that you not delete or corrupt it.
Despite the fact that the repository is initialized, it still has nothing inside of it - the files already in the folder don’t count. Everything that you want to be saved in version control has to be explicitly added. We can quickly add all of the files already in the directory by typing the following:
git add .
Not only does that add all the files in the current folder (or directory - you’ll note I use the terms interchangeably) but also all the files in all subfolders, their subfolder and so on - this is called adding files in a recursive fashion. Not all git commands work recursively but luckily this one does. You can confirm that all of the files have been added by typing the following command:
git status
This command prints out a brief description of the state of the repository - the output should look something like this:

On each line where it says ‘new file’ it shows one of the files that has been added. At first glance I can see that it includes not only files in the current folder, but also files in two different subfolders. That seems to confirm that it recursively added all files, but we can do a quick listing to confirm. Type this and you should see the following response:
dir /b/ a-d /s
This command lists all files in the current directory and all of its subdirectories. On my machine it produces the following output:
c:\Users\Stephen\Dropbox\Projects\helloWorld\makefile
c:\Users\Stephen\Dropbox\Projects\helloWorld\bin\helloWorld.exe
c:\Users\Stephen\Dropbox\Projects\helloWorld\src\helloWorld.c
This shows three files and ‘git status’ showed three added files - this confirms that we’ve added all of the project’s files to the repository.
Adding the files isn’t the last step though. Before anything changes in the repository we need to commit the changes. That’s done with this command:
git commit
Which produces the following output:
c:\Users\Stephen\Dropbox\Projects\helloWorld>git commit
*** Please tell me who you are.
Run
git config --global user.email "you@example.com"
git config --global user.name "Your Name"
to set your account's default identity.
Omit --global to set the identity only in this repository.
fatal: unable to auto-detect email address (got 'Stephen@Stephen-Lappy.(none)')
This is so frustrating! I just want to use source control. Why does Git need my email address? I’m not signing up for a website am I? Is it accessing a server on the internet? What is going on?
Git isn’t trying to steal your personal information - it just needs some way to distinguish you from everyone else. Okay, you may still be crying foul - what everyone else? This is just on your computer right? Yes, it is. However, Git is designed from the ground up to be multi-user and internet capable. The primary example is github.com - a site that offers free Git repositories to any open-source projects. Anyone can make a repository (repo for short) and put it online or download a repository from the internet to their computer - all through the command line.
So no, it doesn’t need your real email address or internet connectivity to work with the repository we just made, but it does need something to identify you. Luckily, we can give it anything we want, so type the following commands in:
git config user.email “root@localhost”
git config user.name “root”
Those of you familiar with Unix-like operating systems will recognize ‘root’ as the user with full control over the system - no questions asked. ‘localhost’ always refers to the computer you’re typing at, so ‘root@localhost’ means ‘the undisputed ruler of the computer I’m typing at’. It’s a bit of a lofty title once you pick it apart, but I like assigning myself lofty titles.
You might also notice that the error message suggested using the command ‘git config --global user.email’ and ‘git config --global user.name’ but the commands we used omitted the ‘--global’. By omitting this, the settings only apply to the current repository and not to all repositories forever on this computer. Since we’re only concerned with this repository for the moment, it’s appropriate to limit the scope of the changes we make to this repository only (in case we ever do decide to go on the internet with Git).
Since you just configured your username and email address, you should be able to commit now by typing:
git commit
Doing so yields this screen:
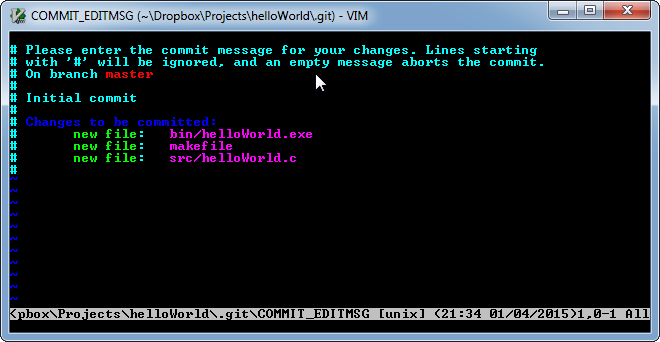
Whoa - colors! What is going on here?
Version control is fundamentally all about record keeping, so Git requires that you explain why you are making a commit to the repository in a commit message. The commit message gets saved alongside all of the changes to the repository so anyone can come back and (hopefully) audit the changes made to the code to assign blame or praise to those responsible. What has just showed up is the text editor used to create the commit message.
Specifically, this text editor is called vim. vim is short for vi - improved. vi is a classic text editor that’s been around the Unix/Linux software ecosystem forever (nearly 40 years at this point). Any software that has been around that long is around for a reason. The reason vi and its successors such as vim are still around is because they are deeply loved by the people who use them. Very deeply. At this point it borders on religious devotion for some. With that in mind it’s best that I choose my words regarding vim carefully.
Whereas most text editors try to make it easy for you to edit text, vim takes a different approach. What approach is that? I can’t exactly say - I’ve never made the effort to establish more than a passing familiarity with it and I have never had a discussion with someone who felt passionately about it. I will say that it isn’t well suited for casual users.
With that being said it’s not an intractable problem. All you have to do is follow these instructions:
- Hit ‘i’ - this puts you in ‘insert mode’ with allows you to type
- Type ‘Initial commit’ - this is your commit message.
- Hit ESC - this takes you out of insert mode.
- Type “:wq” - The ‘:’ signifies a command. ‘wq’ means ‘write, then quit’ - essentially, save and exit
And that’s it. vim will exit and the commit process will continue. You should see this after you exit vim:
3 files changed, 16 insertions(+)
create mode 100644 bin/helloWorld.exe
create mode 100644 makefile
create mode 100644 src/helloWorld.c
And that’s it - your first commit! You can verify that it took by typing:
git log
Which should produce this:
commit a04a16f938305cd7aef24428210ab73f5660e13f
Author: root
Date: Wed Apr 1 21:34:47 2015 -0400
Initial commit
There’s your log message, username, password and the date it occurred along with a commit ID (the long hexadecimal number at the top).
Reverting Changes
While accountability may be exciting it’s not nearly as useful to an individual programmer as the ability to revert changes back to the last commit or retrieve code previously committed. I’d be remiss in introducing you to Git without showing you its most useful feature.
To illustrate this, let’s make a change in our helloWorld.c file thusly by deleting the semicolon at the end of the printf line:
#include
main ( )
{
printf("I changed it okay?") //Semicolon removed here
}
On the command line, try to build your program:
mingw32-make
And see the not-so-good result:
src/helloWorld.c: In function 'main':
src/helloWorld.c:6:1: error: expected ';' before '}' token
}
^
makefile:2: recipe for target 'all' failed
mingw32-make: *** [all] Error 1
This is going to happen to you a million times before you’re done programming - make some changes and then find out your program doesn’t compile anymore. With version control you always have the option of going back to the last commit. Git does this via a ‘reset’. Type this command:
git reset --hard
This should produce this output:
HEAD is now at a04a16f Initial commit
Now, try to make your Hello World program again and it will build with no errors. If your text editor is open it might tell you that the helloWorld.c file changed. Reopen the file and you’ll see that the semicolon is right back where it was before - that’s the magic of version control.
It’s very likely that your changes since the last commit will consist of more than just a missing semicolon. You don’t want to code for hours just to find that it won’t compile and your only option is to lose all of your changes - even the ones that compiled fine. It’s important to not only know the mechanics ) of working with version control (ie, what to type on the command line) - it’s important to have the right habits and practices as well. With that in mind, there’s several rules of thumb that you should follow when working with version control:
- Commit often - Any time you come to a stopping point and the code compiles fine, commit it. Not only does it allow you to go back to known, working code, but the commit messages will help you keep track of your development progress.
- Never commit code that doesn’t compile - This is a cardinal sin when you work on source code with other developers so it’s best to start honoring this practice right now before someone gets very mad at you.
- Everything important is in version control - If there’s a file you need to make your software then it is in version control - no questions asked. If it isn’t in version control it can’t be brought back if it’s accidentally deleted or modified.
- Double check your commits - While anything can be reverted with version control it can be a hassle - a large hassle if you’re working with other people. You can see what will happen in a commit by typing ‘git commit --dry-run’. This will show the effect the commit will have before you commit anything.
- When in doubt, commit - At some point you may be messing around with changes to code that you’re not quite certain you want to keep long-term, but need to stick around short-term for sure - maybe to finish up debugging of a new feature. You’ll hesitate to commit for fear that you’ll just have to remove all of the changes later - extra work!. Don’t give in though! If you’re not willing remove the changes right now then they’re important enough to keep around in version control. Better to have them and not need them than lose code that you know works (if only for a one-off task) because you were too scared to commit it.
In addition to those nuggets of wisdom, I’ve created a table below to summarize common commands used with the Git command line. These should be most of the commands you’ll need to work with Git as an individual developer for the time being.
Common Git Commands
|
Command |
Description |
Example |
|
git init |
Initializes a repository in a non version-controller directory. |
git init |
|
git add |
Adds a file not under version control to version control. NOTE: The file is not actually added until a commit. |
git add . - Adds all files in current and sub directories git add makefile - Adds a single file called makefile |
|
git commit |
Commits all changes in the directory to version control. This is essentially ‘saving’ your changes to version control. |
git commit - Opens the vim editor to enter a commit message, then commits when finished git commit -m “Initial Commit” - In this example, the commit message is specified on the command line and vim is not used. |
|
git status |
Lets you see what files have been changed before you commit the changes to version control. |
git status |
|
git reset --hard |
Gets rid of all of the changes you’ve made since the last commit. |
git reset --hard |
Further Reading
And finally, if you want to know more, here's a list of some of the topics in this article and further reading on them:
- Why use version control? - Stackoverflow has some highly opinionated and highly accurate people offering good answers to that question.
- Git - An outstanding collaborative Stackoverflow post on how and why to use Git
- Vim - Take a look at the Vi Lovers Home Page if you want to know more about this editor. That page can offer more and better information on the subject than I can.
Later articles may introduce more advanced concepts such as branches and using Github to collaborate with others. For now, experiment on integrating Git into your workflow to see how version control can help you be more productive.


- Comments
- Write a Comment Select to add a comment

Also Git isn't the most user-friendly software to introduce someone to VCS... I'd wholeheartedly recommend Mercurial over Git for personal projects (with the one exception that GitHub is awesome + doesn't support Mercurial)
With that said, I think it could be much worse. "We" could all be stuck using Visual source safe, and having our version control deciding to "conveniently" lose our source for us. I also do not know mercurial, but with everyone, including Linus using git . . . I do not see why we should not learn how to use it.
The platform on which we learn to use git on the other hand, I'd consider a debatable subject. . .
To post reply to a comment, click on the 'reply' button attached to each comment. To post a new comment (not a reply to a comment) check out the 'Write a Comment' tab at the top of the comments.
Please login (on the right) if you already have an account on this platform.
Otherwise, please use this form to register (free) an join one of the largest online community for Electrical/Embedded/DSP/FPGA/ML engineers:


