


Getting Started With Zephyr: Saving Data To Files
Introduction
I have mainly focused on Zephyr infrastructure and internals in this blog post series introducing The Zephyr Project RTOS. As a reminder, Zephyr aims to be a premier RTOS for connected, resource-constrained devices. Zephyr integrates open-source and security best practices to ensure a vendor-neutral, secure, and reliable platform.
Quick Links
- Part 1: Getting Started With Zephyr: West Manifest Customization
- Part 2: Getting Started With Zephyr: Kconfig
- Part 3: Getting Started With Zephyr: Devicetrees
- Part 4: Getting Started With Zephyr: Devicetree Bindings
- Part 5: Getting Started With Zephyr: Devicetree Overlays
- Part 6: Getting Started With Zephyr: Saving Data To Files
- Part 7: Getting Started With Zephyr: Writing Data to EEPROM
- Part 8: Getting Started With Zephyr: Bluetooth Low Energy
In previous blog posts, I have described the West meta-tool for setting up a Zephyr project (https://www.embeddedrelated.com/showarticle/1505.php), I have shown the OS can be customized using Kconfig (https://www.embeddedrelated.com/showarticle/1541.php), and how hardware can be customized using Devicetrees (https://www.embeddedrelated.com/showarticle/1547.php). I will focus on Zephyr-based applications relevant to embedded systems in the next two blog posts.
In this blog post, I will show how to create an application in Zephyr to store data on a microSD card. While most embedded systems nowadays have internet access to upload sensor data, the connection may be spotty. The presence of a microSD card has two advantages. First, it’s expandable. Whereas onboard RAM and Flash storage are fixed, a micro-SD card of one size can be swapped for a larger one. Second, data from a microSD card can be retrieved onto a desktop PC.
Hardware
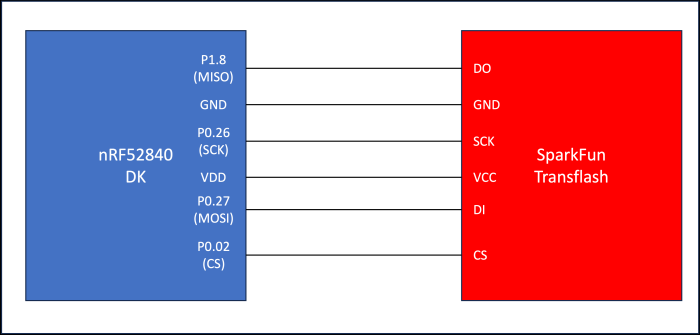
This blog post will use the Nordic nRF52840 development kit (https://www.nordicsemi.com/Products/Development-hardware/nrf52840-dk). We will connect the nRF52840 development kit to the SparkFun microSD Transflash Breakout board (https://www.sparkfun.com/products/544). Any microSD card from a reputable vendor will suffice.
The following diagram shows the connections between the SparkFun microSD module and the nRF52840 development kit:
Embedded Software
In this section, we will walk through the relevant portions of the embedded software to interface with the SD card. First, we can retrieve Zephyr v3.5 using West by executing the following command:
$> west init -m <a href="https://github.com/zephyrproject-rtos/zephyr">https://github.com/zephyrproject-rtos/zephyr</a> --mr v3.5.0 zephyrproject
$> cd zephyrproject
$> west update
Second, we can clone the repository that contains our test application:
$> git clone https://github.com/mabembedded/zephyr-sd-spi.git
Third, we must ensure that our SD card is formatted using the exFAT scheme (the default in Windows). Finally, we can connect the nRF52840 development kit to our PC using the USB connection and open a terminal interface. We can build and flash the application by executing the following commands:
$> cd zephyr-sd-spi
$> cmake –preset build
$> west build && west flash
We should see the following output in the terminal interface:
*** Booting Zephyr OS build zephyr-v3.5.0 ***
[00:00:00.402,770] <inf> sd: Maximum SD clock is under 25MHz, using clock of 24000000Hz
[00:00:00.414,215] <inf> main: Block count 384503808
Sector size 512
Memory Size(MB) 187746
Disk mounted.
Listing dir /SD: ...
[DIR ] System Volume Information
[FILE] test_data.txt (size = 13)
Successfully mounted SD card
main - successfully created file
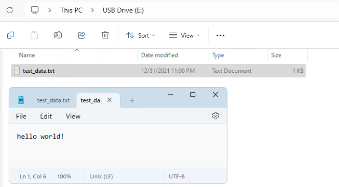
If we plug in the SD card to our PC and open it up in File Explorer, we should see “test_data.txt” with the string “hello world!” on the first line, as seen below:
Kconfig
The following relevant Kconfig options are enabled in the “prj.conf” file, with a description of each:
- CONFIG_DISK_ACCESS: This option allows for the disk access subsystem.
- CONFIG_FILE_SYSTEM: This option allows for the filesystem subsystem.
- CONFIG_FAT_FILESYSTEM_ELM: This option instructs Zephyr to use the “ELM” FAT FS implementation, found on http://elm-chan.org/.
- CONFIG_FS_FATFS_MOUNT_MKFS: This option instructs Zephyr to create a disk with a FAT filesystem if none is found.
- CONFIG_FS_FATFS_EXFAT: This option enables the exFAT partition scheme.
- CONFIG_DISK_DRIVER_SDMMC: This option enables the SD/EMMC driver.
- CONFIG_SPI: This option enables the SPI subsystem.
- CONFIG_GPIO: This option enables the GPIO subsystem.
Devicetree Overlay
We also need to create a Devicetree overlay for two reasons. First, we need to update the pins for the SPI connection from the nRF52840 development kit to the SparkFun Transflash breakout board. Second, we must instruct the application firmware that we have an SD card connected.
To update the SPI pins, we first need to add a new entry to the pinctrl block, as shown below:
&pinctrl {
        custom_spi: custom_spi {
                group1 {
                        psels = <NRF_PSEL(SPIM_SCK, 0, 26)>,
                                <NRF_PSEL(SPIM_MOSI, 0, 27)>,
                                <NRF_PSEL(SPIM_MISO, 1, 8)>;
                };
        };
};
Then, we need to update the SPI block in the overlay with our custom pinctrl (and also add the GPIO for the CS line):
&spi1 {
        status = "okay";
        pinctrl-0 = <&custom_spi>;
        pinctrl-1 = <&custom_spi>;
        pinctrl-names = "default", "sleep";
        cs-gpios = <&gpio0 2 GPIO_ACTIVE_LOW>;
.
.
.
The following needs to be added in the “spi1” node to inform the application of the existence of the SD card:
.
.
.
        sdhc0: sdhc@0 {
                compatible = "zephyr,sdhc-spi-slot";
                reg = <0>;
                status = "okay";
                label = "SDHC_0";
                mmc {
                        compatible = "zephyr,sdmmc-disk";
                        status = "okay";
                };
                spi-max-frequency = <24000000>;
        };
};
Application Source
We can walk through the implementation with the Kconfig and Devicetree Overlay in place. I’ve created two helper functions to confirm that our application can correctly read the files in the SD card. The first function is “lsdir,” which has the following prototype:
static int lsdir(const char *path);
This function takes a particular path as an input and prints all the directories and files inside the path. The second function, which uses “lsdir”, is “mount_sd_card.” This function performs the following actions:
- Initializes the underlying disk via “disk_access_init.”
- Retrieves the number of sectors via “disk_access_ioctl” with “DISK_IOCTL_GET_SECTOR_COUNT” as a parameter.
- Retrieves the sector size via “disk_access_ioctl” with “DISK_IOCTL_GET_SECTOR_SIZE” as a parameter.
- Prints the total space of the SD card using the information retrieved above.
- Mounts the SD card. If the SD card was successfully mounted, the function lists the files and directories at the root of the SD card. If not, the function tries to mount again.
“mount_sd_card” is used as the first function in “main.” On success, it initializes a "fs_file_t" data structure, shown below. The data structure will be used for all subsequent file operations.
struct fs_file_t data_filp;
fs_file_t_init(&data_filp);
Then, “test_data.txt” at the root of the SD card is deleted if it exists, using the “fs_unlink” function. A new file called “test_data.txt” is created and opened for writing using the following line:
fs_open(&data_filp, "/SD:/test_data.txt", FS_O_WRITE | FS_O_CREATE);
Finally, the following lines are used to write “hello world!” to the file that was created:
sprintf(file_data_buffer, "hello world!\n");
ret = fs_write(&data_filp, file_data_buffer, strlen(file_data_buffer));
fs_close(&data_filp);
Summary
In this blog post, I showed how to implement a Zephyr application to mount a microSD card, create a new file on the microSD card, and write data to it. The lessons learned from such an application can be helpful for devices out in the field that need to write data to off-board memory periodically, especially in cases where Internet access may be sporadic. In the next blog post, we will continue our journey where we write a custom BLE application running on Zephyr!


- Comments
- Write a Comment Select to add a comment
To post reply to a comment, click on the 'reply' button attached to each comment. To post a new comment (not a reply to a comment) check out the 'Write a Comment' tab at the top of the comments.
Please login (on the right) if you already have an account on this platform.
Otherwise, please use this form to register (free) an join one of the largest online community for Electrical/Embedded/DSP/FPGA/ML engineers:


